
We may earn revenue from the products available on this page and participate in affiliate programs. Learn More ›
Connections are made between sections of iron pipe using threaded fittings. The walls of copper pipe, however, are too thin and soft to be threaded, so a different sort of fitting is used, called a sweat fitting. It’s called that because the process of joining the various elements using solder involves heating them with a propane torch until they seem to sweat.
There’s no particular magic required to solder a sweat fitting, though the very presence of a propane torch makes it a procedure that must be done carefully. Making a tight, leak-free joint is more a matter of careful preparation of the parts than of skill or experience.
STEP 1
Polishing the tubing and fittings. The individual lengths of tubing that link the elements of the plumbing system are connected at fittings. The fittings come in a variety of configurations, including elbows, Ts, forty-fives, couplings, and others. No matter what fitting you are sweating, however, the first step to the process is smoothing and polishing the areas to be joined.
Lay out the arrangement of pipes and fittings, and cut the pipes to length. Make sure the ends are cut square. Use a utility knife to trim off any burrs from the cuts.
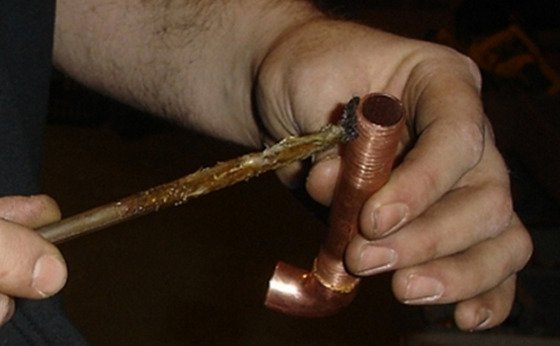
At each joint, polish the outside of the pipe using plumber’s tape (also called emery cloth, it’s sold in narrow strips). Another convenient option for shining pipe surfaces before sweating them is a synthetic, woven abrasive pad. Sold as stripping pads, they resemble those sold for scrubbing pots but will clean and brighten copper in a few easy strokes.
Polish the openings of the fittings, too, using a wire-brush pipe cleaner. Polishing both surfaces is critical: blemishes left on the connecting surfaces are likely to produce leaks later because the solder will not bond properly.
STEP 2
Flux the fittings. Apply plumber’s flux to the inside of each fitting to be soldered. Use one of the inexpensive flux brushes made for the task, as it keeps your fingers and hands clean. The flux has the consistency of a thin grease, and when heated will draw the solder into the fitting. Slide the pipe into the fitting, give it a twist to spread the flux evenly, and wipe off any excess flux that squeezes out.
STEP 3
Igniting the torch. Now you are ready for the torch. I always wear gloves when using a torch. It’s a small safety precaution, and all the work that requires lots of finger dexterity is completed by this stage.
To light the torch, open the valve slightly; you will hear a gentle hiss of the escaping gas. The nozzle is designed so that oxygen from the atmosphere of the room is drawn into intake holes, mixing with the propane. Light the flame using a sparking tool or open flame lighter.
STEP 4
Heating the fitting. The hot point in a flame isn’t closest to the nozzle, as many people erroneously think, but rather about halfway along its length. Position the torch so that the flame heats the fitting directly (not the pipe). There are almost as many approaches to this as there are plumbers, but my favorite technique is to hold the torch in one position, with the midpoint of its flame heating the section of the fitting that is farthest away from the joint(s) to be sweated. That helps insure that the entire joint is hot when the solder is applied. One aspect about which there is little disagreement is the need to protect surrounding flammable surfaces. A sheet of fireproof material beyond the fitting should be positioned to protect them.
STEP 6
Applying the solder. Let the flux be your guide: When it bubbles out and begins to steam, the melting temperature of solder has been reached. Touch the solder to the pipe. If it melts on contact, you can be sure it’s sufficiently hot.
Remove the flame from the fitting before you apply the solder (it’s the heat of the fitting that melts the solder, not the flame of the torch). If possible, apply the solder from above so that the combination of gravity and capillary action can draw the solder into the joint. You may need to apply the solder to several points around the joint.
Do all the joints on the fitting at once (as on a T, with three pipes, or an elbow with two). The pipe remains quite hot for some minutes, so avoid touching it with your bare skin.
After all the fittings have cooled, test the lines. If a fitting leaks, you can’t go back and just apply more solder. I’m sorry to say that the joint must be reheated until the solder softens; then the joint must be pulled apart, the elements cleaned, fluxed, heated, and soldered all over again.