We may earn revenue from the products available on this page and participate in affiliate programs. Learn More ›
Cutting drywall isn’t a difficult job and requires very few tools. However, cutting panels to the right size and making clean and precise holes for outlets, switches, and windows requires proper technique. The best way to cut drywall results in panels that fit together snugly when hanging them to either repair a damaged section of drywall or install drywall in an entire room.
There are two basic methods for cutting drywall: score-and-snap and drywall saw. Ahead we’ll break down how to cut drywall using both methods with help from Danny Niemela, vice president and CFO of ArDan Construction, a Scottsdale, Arizona-based luxury home remodeling company, and Dan Shirley, owner of Chicago-based home repair and renovation company Chicago Handyman.

Tools & Materials
Bobvila.com may earn a commission from purchases made through these links.
Safety Precautions
Cutting drywall releases fine particles of gypsum, talc, silica, and mica into the air, which are harmful to your lungs if you inhale them. With that in mind, it’s crucial to wear a respirator whenever you’re cutting drywall. While a respirator is the best option, you can also use a disposable N95 mask, which will also filter out those finer particles. Along with a respirator, wear safety goggles to keep dust out of your eyes.
How to Cut Drywall: Score and Snap
Scoring and snapping drywall isn’t complicated, but positioning it for measuring and snapping can be physically demanding. A 1/2-inch sheet of drywall weighs more than 50 pounds, so consider enlisting a helper to make moving the sheets of drywall around easier.
Read on to learn how to cut drywall sheets.

Tip
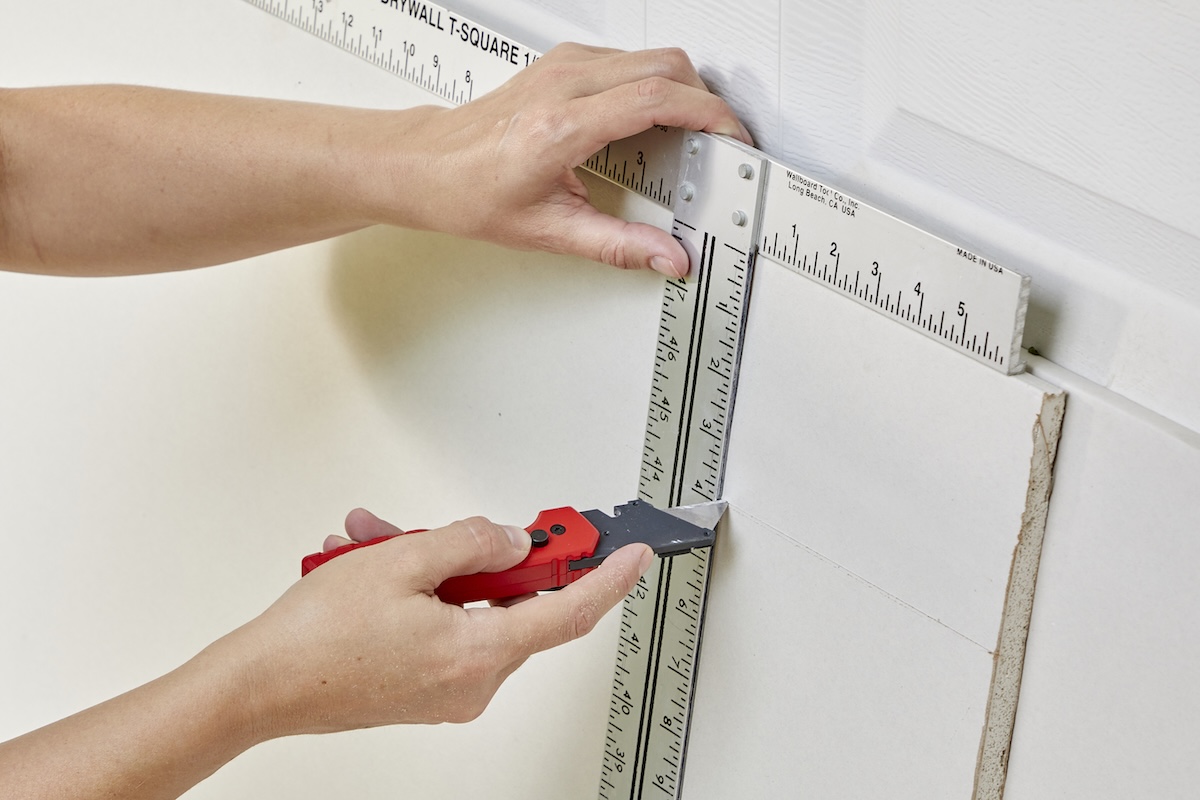
It’s best to cut a sheet of drywall to length before making rip cuts. This will keep the factory edge intact, allowing you to use a T-square and utility knife to score and snap rip cuts with greater accuracy, as shown in the photo at the top of the article.
Step 1: Measure the drywall.
Plan your layout so you can use as many full sheets as possible. This strategy minimizes the number of seams you’ll need to mud later. When you encounter a space that’s too small for a full sheet, start by using a tape measure to determine the dimensions of the area. Measure both edges for each dimension, then use the smaller of the two measurements. If the two measurements are off by more than a 1/2 inch, cut the panel out of square to exact measurements, so it fits the space.
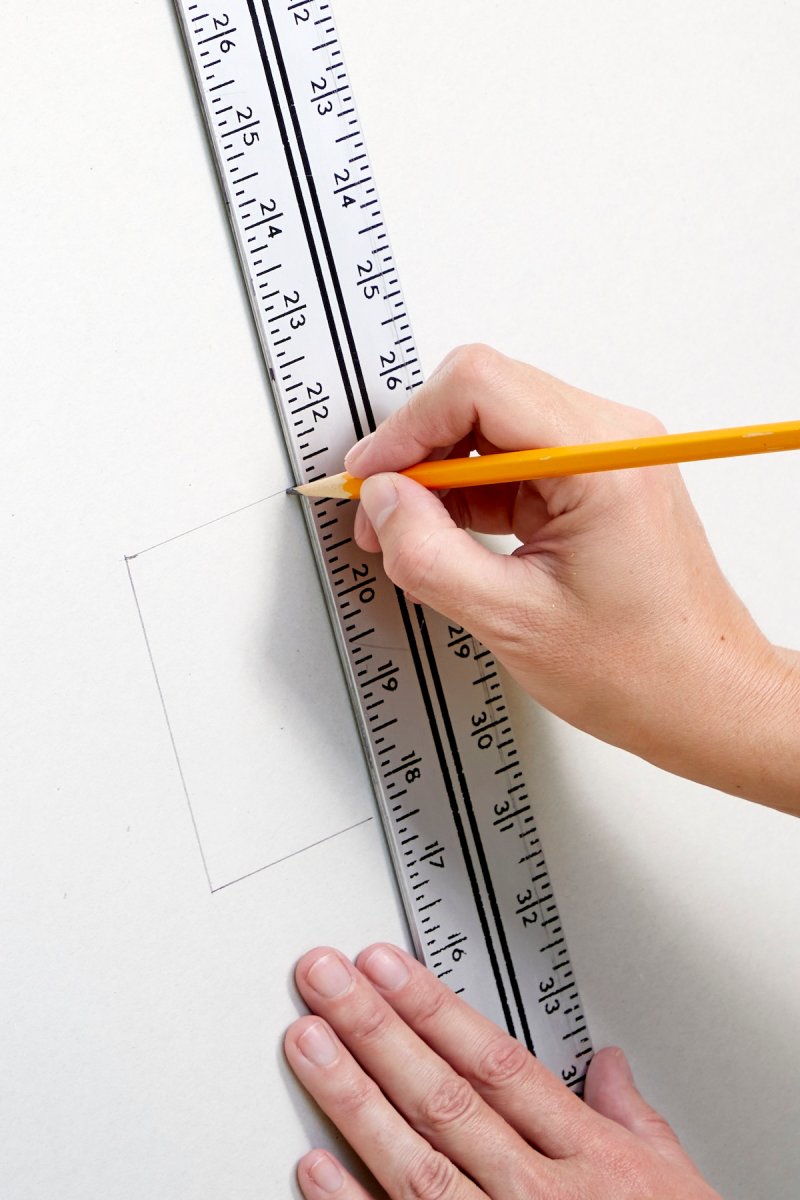
Step 2: Mark the drywall.
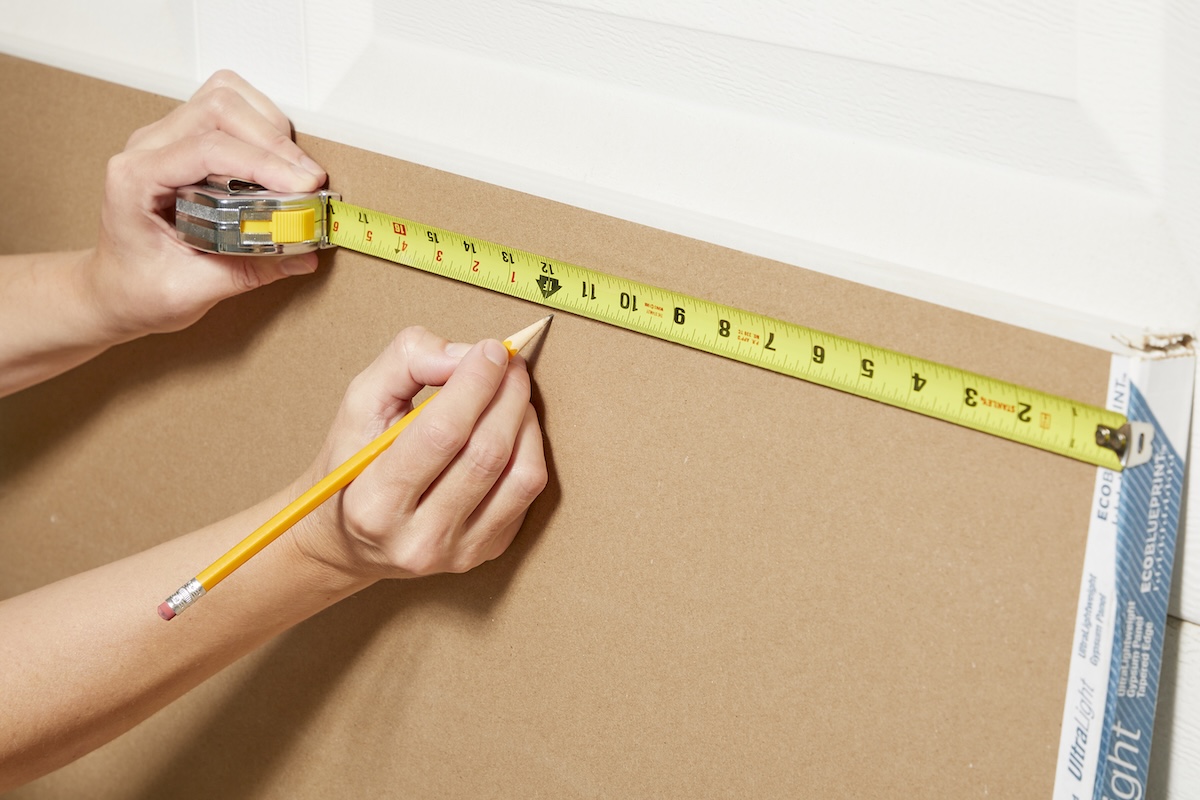
Mark the panels using a pencil and a straight edge, such as a T-square. Niemela advises making your marks about 1/8 of an inch shorter than your measurement to allow for a small gap between the drywall and other surfaces, such as walls, ceilings, and other drywall panels.
“The tighter the fit, the harder it is to adjust in placement at time of install particularly on window returns or full ceiling sheets,” Niemela says. Any small gaps left are easy to fill during the mudding process. Also, leave about a 1/2-inch gap between the drywall and the floor when you’re measuring to prevent moisture damage.
Step 3: Score the drywall.
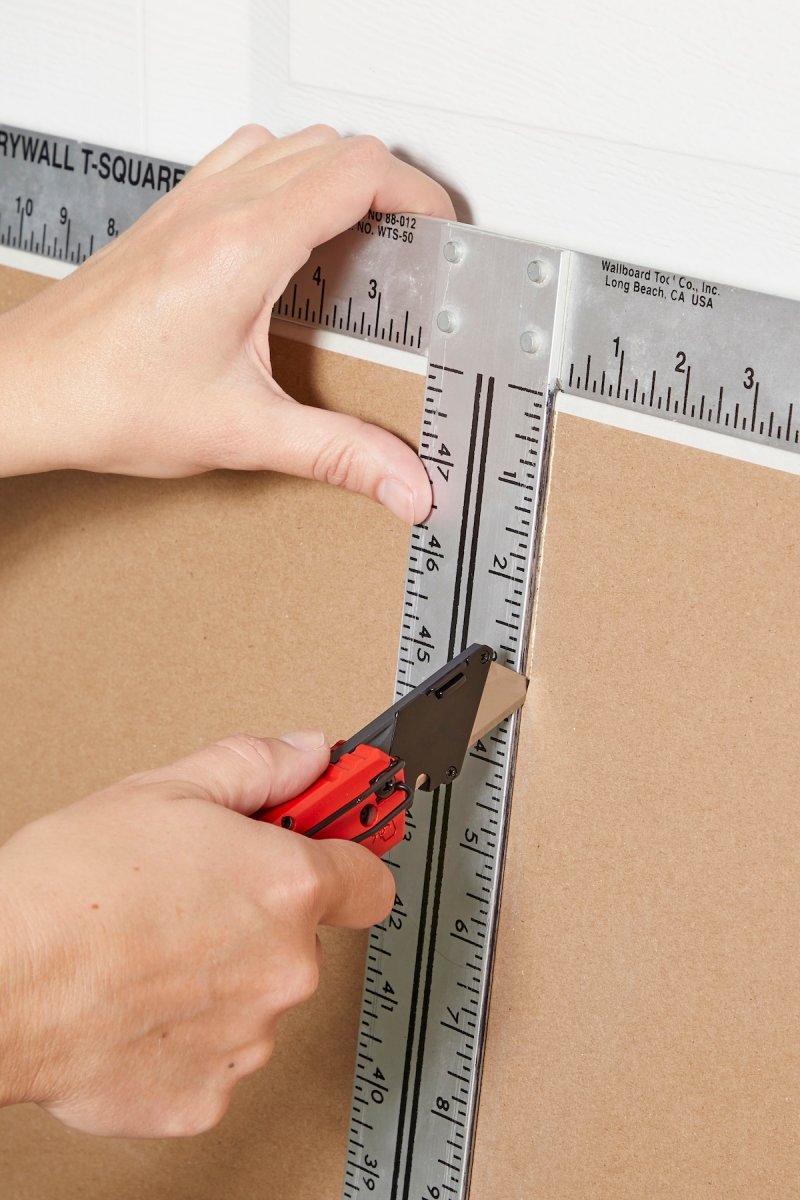
Use a T-square to act as a cutting guide. Hold the T-square along the marked cutline and use a utility knife to score along the line. You don’t need to make a deep cut when using a utility knife for cutting drywall, just enough to break through the paper and score the gypsum.
“When starting off, beginners should score drywall with about the same amount of pressure used to cut a pizza,” Shirley says. “I always discourage beginners from using too much pressure because wrist sprains and injuries can be common.”
Step 4: Snap the panel.
Use your knee to apply pressure on the back side of the board to snap the panel. “Do not bend it like cardboard,” Niemela says. “Let the score do the work.” The drywall should snap cleanly along the edge. Hold the drywall so that the cut pieces are perpendicular to each other, then cut through the other side of the paper by running a utility drywall knife along the creased edge.
Step 5: Smooth the edge.
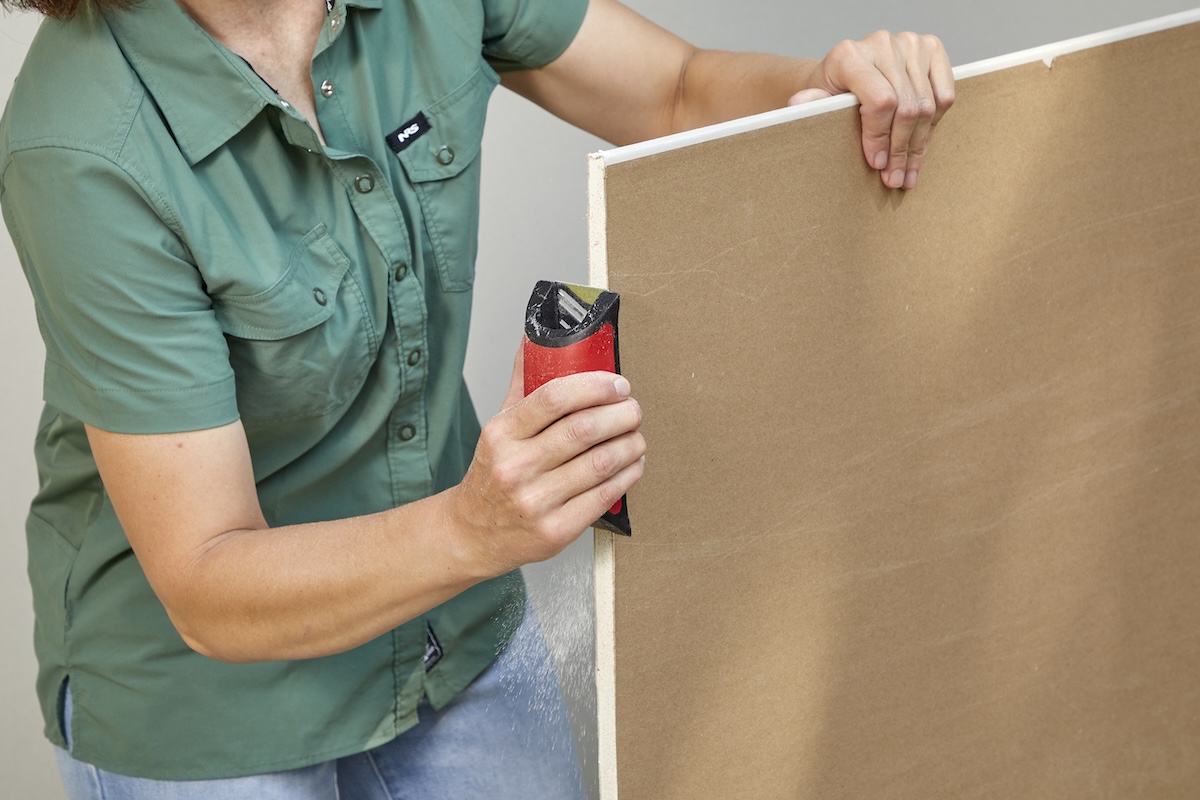
Sometimes you may end up with a ragged edge after snapping a drywall panel. Use a rasp to smooth out any ragged edges or to remove small amounts of drywall if you’ve cut it too long. Move the rasp over the edge of the drywall, using a back-and-forth motion, focusing on any uneven areas.
“Be sure to hold the opening of the rasp towards the floor to keep falling dust to a minimum,” Shirley says. “You might end up with some curling paper at the edges and you can remove that with your utility knife.”
How to Cut Drywall: Jab Saw
While scoring and snapping is the best option for straight cuts when cutting drywall, you may also need to cut openings for electrical boxes, execute curved cuts, or remove small sections of drywall when damage is too extensive for a drywall patch. The best tool to cut drywall for these situations is often a jab saw. Cutting with a jab saw sends a lot of dust airborne, so cover furniture and cabinetry with plastic sheeting before you get started.
Safety note: Before measuring for electrical boxes, make sure the wires are pushed to the back of the box and that power to the outlet or switch is shut off at the circuit breaker panel.
Step 1: Measure and mark openings.
You have a couple of options for measuring and marking openings, such as light switches and outlets. Measure the distance from the floor to the center of the electrical box using a tape measure, then use a spare electrical box as a template and trace around it to mark the hole. Make sure to mark the face of the drywall as the saw blade will leave the opposite side of the drywall ragged. (You won’t see the back side of the panel when the drywall is installed).
Tip
An easier option for marking openings in drywall is to use a tube of lipstick. Coat the edges of the electrical box in lipstick. Set up a drywall panel on the floor so it’s aligned with its location on the wall, then press the panel up against the electrical panel. The lipstick will leave an outline of the electrical box that shows exactly where to cut.
Step 2: Make the cut.
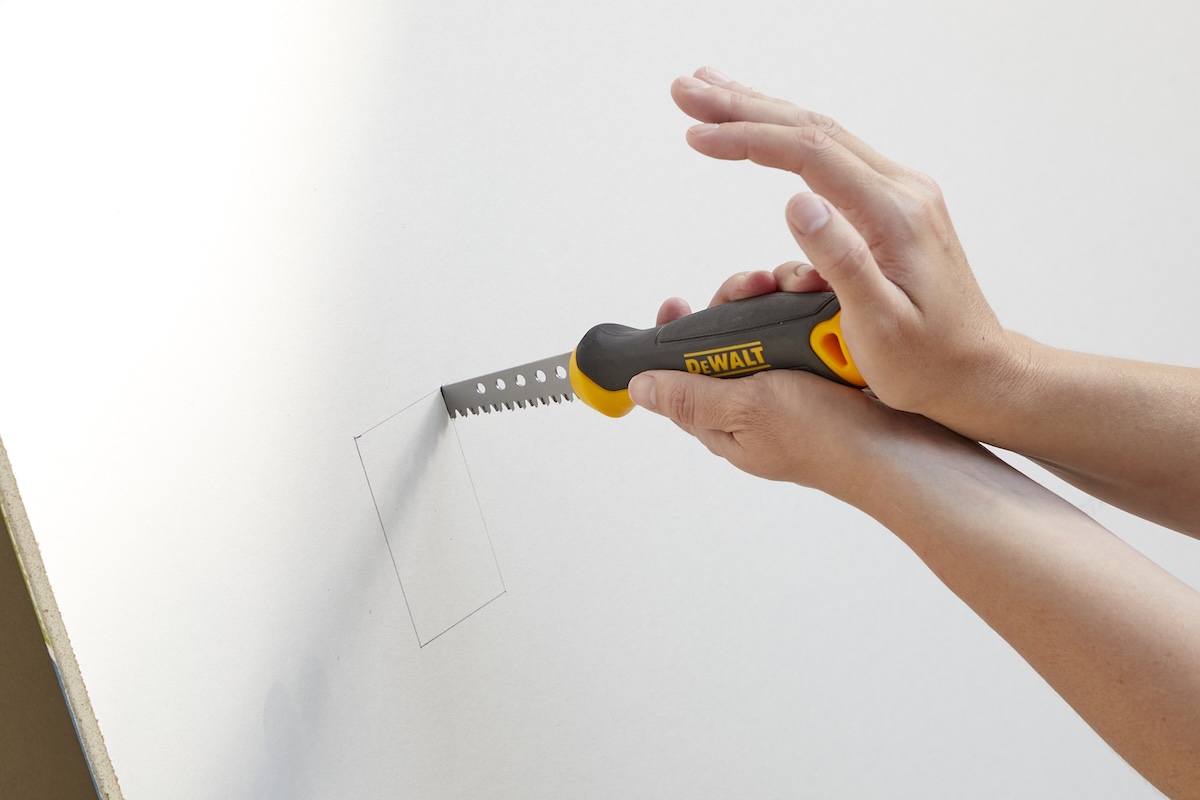
Jab saws have a sharp tip that can pierce drywall. Jab the blade into the drywall somewhere along the cutline. (You can also drill a small pilot hole into the drywall to start the cut.) Begin moving the saw back and forth to saw through the drywall along the marked line using even strokes and consistent pressure.
“Do not muscle it,” Niemela says. “Steady back and forth motion and keep your cuts within your lines.” When you get to the corner of a cut, pull the blade almost completely out of the drywall, rotate it 90 degrees, and jab it back into the drywall to continue with the cut.
Step 3: Fit and make adjustments.
After cutting the opening, attempt to fit the panel of drywall over the outlet or switch. If it’s too small, use a utility knife to shave away small amounts until it fits. Don’t attempt to attach the panel to the wall until you’ve made adjustments, or you could damage the drywall around the opening.
Tip
Shirley advises cutting holes for switches and light outlets slightly larger to allow for enough clearance. “Give yourself a ¼-inch allowance on each side of the opening for lights outlets and switch outlets,” he says. “So if the box is 4 inches wide, cut the drywall 4.5 inches wide total.”
Additional Drywall Cutting Tips
In addition to the above steps, you can up your drywall cutting game by incorporating the following tips and optional tools for drywall:
- Use an oscillating tool. Drywall saws can penetrate up to 6 inches into a wall, potentially damaging plumbing and electrical behind it. Shirley recommends using an oscillating tool if you’re cutting into existing drywall. “New oscillating tools allow for plunge cuts with extreme accuracy and can remove wallboard by only penetrating up to a ¼-inch into the wall cavity,” he says.
- Smooth the edges: Whether cutting drywall using the score-and-snap technique or a jab saw, it’s crucial to smooth out the edges using a rasp or sanding sponge. “Do not leave it rough thinking mud will hide it,” Niemela says. “That mistake shows up every time, once you paint.”
- Label your pieces: When you’re measuring and cutting multiple pieces of drywall, it’s easy to forget where each piece goes, especially on bigger jobs. Niemela suggests labeling each piece with its intended location.
