We may earn revenue from the products available on this page and participate in affiliate programs. Learn More ›
Gardeners who live in areas with short growing seasons—the time from last to first frost—ought to be able to grow a kitchen garden as much as those who live in frost-free areas. Though climate change has lengthened average growing seasons on the national level, that’s partly due to increased average temperatures. So heat might become as big a concern as frost for some areas and specific vegetables we grow, like tomatoes.
If you’re serious and have the funds, you can rely on big-ticket help from greenhouses, cold frames, or hoop houses. However, to help reach your goals for growing food—whether they relate more to saving money on produce, growing organically, or growing enough to can or dry food—you also can turn to some repurposed objects and less-expensive solutions. After gardening for 6 years in a region at high altitude, a mid-May last frost date, and daily temperature swings of up to 50 or 55 degrees from overnight to afternoon, I learned a few tricks for protecting plants with both purchased and repurposed objects.

Warming Seeds or Starts
Most vegetable gardeners get a little impatient in spring, especially me. I always put my cucumber seeds in before the soil is warmed enough (minimum of 60 degrees Fahrenheit). But I found that if I warm the soil before and during germination, I have better success.
- Walls of water: These or similar solar structures can warm soil and plants. You fill the slots with water and let the top close like a teepee. The water soaks up sunlight and keeps the area inside warm overnight. These are a great tool for planting tomato or pepper starts, as long as you only leave them on until the temperatures warm and before the plants grow to reach the narrow sides at the top. The plastic containers can leak eventually, and probably need replacing every few years.
- Pop-up protector cages: My new raised beds are not in a good spot for dragging a hose to fill walls of water. So I ordered some Gardener’s Supply Company Pop-up Tomato Protectors and have been happy with the results. By zipping them closed, you can retain warmth inside, and you can unzip the solid top easily and leave a mesh top only to ensure air flow but keep out grasshoppers or other pests. They come with landscaping staples to secure them into the soil.
- DIY cloches: You’ve probably seen milk jug hacks to replace glass cloches. I prefer something with a wider mouth that I can turn upside down (though you can leave on a milk jug cap and cut out the bottom instead). I save small clear plastic containers from Costco and turn them upside down. I don’t need to cut them, just poke a few ventilation holes in the bottom (which becomes the top). They are tall enough to cover seeds, seedlings, and small transplants.
- DIY bucket cover: Though they don’t let in as much light or heat as a clear cloche, a 5-gallon bucket can work in a pinch. We cut the bottoms off several of ours and twist them into the ground around a plant or patch of soil. Clip on a doubled piece of old sheet or row cover to hold in some warmth at night. Just be sure to open up the cover for part of the day to let in sun and air.
- Floating row cover: Floating row cover is a plant protector that can provide from 2 to 10 degrees of frost protection, depending on its weight. I love Johnny’s DuraSpun 45 from Johnny’s Seeds, although it is a lightweight row cover. Just lay it directly on the ground and secure it well with bricks, rocks, or yard staples until seedlings emerge. You also can purchase row hoops to hold them higher. One reason I use light fabric is that I leave my basil covered for the entire growing season to keep grasshoppers and other leaf eaters off the plants, since their value is in the leaves, not fruit.

Shading During Peak Heat
All seedlings or transplants need a little help if peak heat hits earlier than normal. The heat can stress them and prolong growth. Tomatoes, in particular, are vulnerable to heat. When temperatures consistently hit over 90 degrees Fahrenheit during the day or no lower than 70 degrees Fahrenheit for several nights, tomatoes can drop flowers and lessen or halt fruit production. I’ve tried several ways to shade young plant starts (even ornamentals) and to protect tomatoes or other vegetables during peak heat.
- Shade cloth: You can find shade cloth in rolls or as tarp-like cloths with grommets for easy attachment. Most plants do best with about a 40 to 50 percent shade rate. I bought some 70 percent cloth for my tomatoes in Zone 7b. The trick is to ensure plants get enough sunlight without cooking, so you might have to try a few solutions. Since I use a heavier cloth, I always try to delay putting it up until the tomatoes have already received at least 6 hours of sunlight that day. I take them down at sunset.
- Sheets: You can repurpose old sheets to shade plants, but since they are more tightly woven than a mesh fabric, it’s unclear how much light they let in. So, be careful about how long you cover plants and ensure that air can flow around them while the sheets are in place.
- Lawn chairs: Fold-up webbed lawn chairs are not as popular (and certainly not as comfortable) as newer portable camping chairs, but they make excellent shade covers for small plants. The mesh lets air flow through and the legs hold the seat above the plant. They are lightweight, however, so you might need to secure each leg with a yard staple or brick.
- Growing in containers: I always like to grow one cherry tomato on my patio in a container. Large plastic containers are easy to move, so I can pull the container into the patio cover shade when temperatures rise and pull it back out that evening.
- Plants shading other plants: Once temperatures warm, edibles like lettuce, spinach, and kale start to bolt and lose flavor. I’ve extended my harvest time by planning my garden layout so shade lovers grow on the north or east side of taller, sun-loving vegetables like climbing peas or tomatoes, avoiding the need to use shade cloth. Cilantro and bunching onions also can tuck into shady corners of the garden.

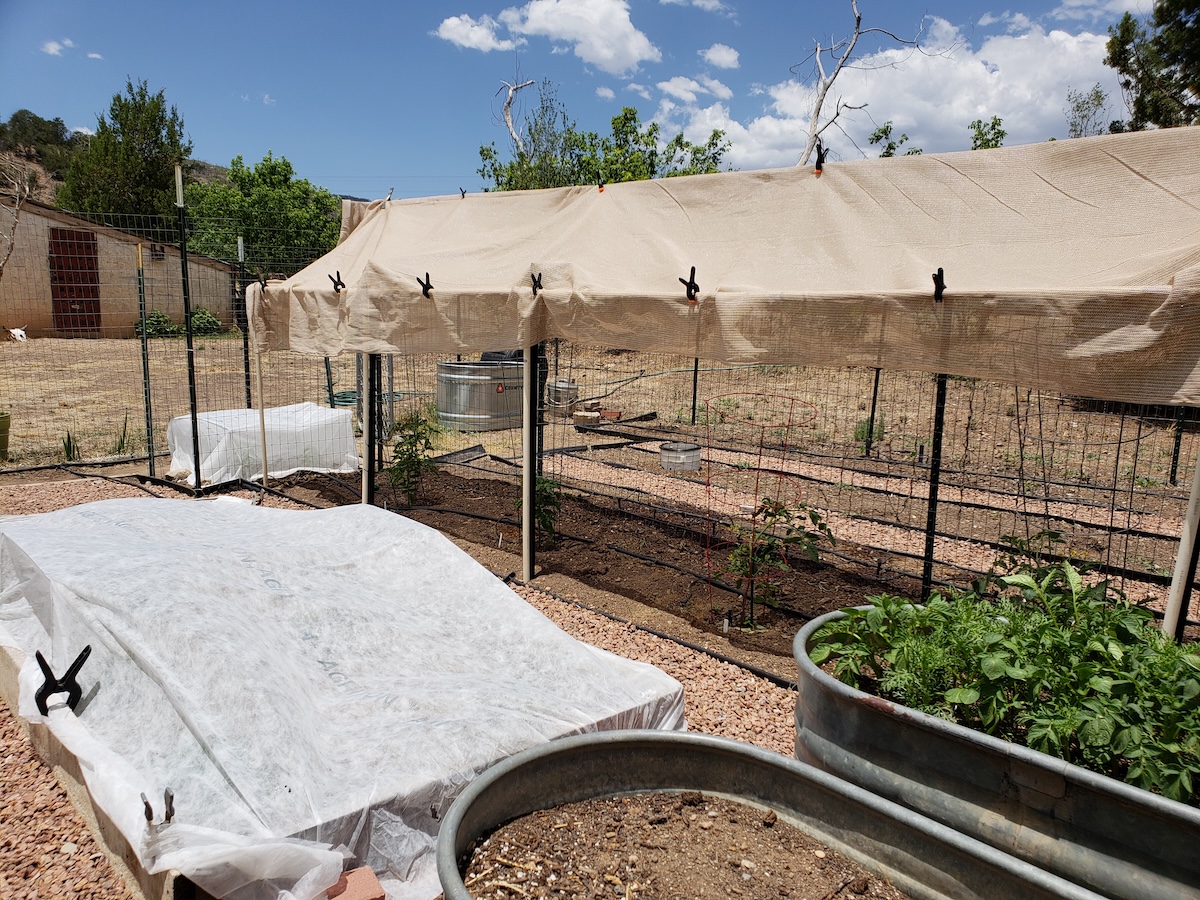
Creating Shade Structures
It’s best not to shade vegetables permanently, so I want simple ways to put up and take down or roll up the shade cloth that I use in the vegetable garden. Instead of purchasing a system, try using leftover building materials or inexpensive items to erect your own shade holder.
- Fencing materials: If your garden already has a fence to keep out deer or small pests, get creative with the fencing and clip shade cloth to the posts or top of the fence to create shade from sun that is directly overhead or to the west of the garden, when it is hottest. Use cable ties if you like to affix one side of the cloth more permanently (for the season) and plastic clips or a similar item to hold it in place while up. Leftover (even slightly crooked) or new fencing stakes can serve to both hold the shade up and secure it.
- PVC pipe: My husband has built frameworks for a large garden and a raised bed garden from leftover PVC pipe. We only had to invest in a few connections. For the large bed, he drove the vertical pipes into the ground against a metal stake for support. In the raised bed, he attached vertical pipes to the inside wood frame of the beds with galvanized pipe hanger straps and screws.
- Tomato cages: Until your tomatoes reach the top of the cage, you can clip shade cloth or light sheets to the tops and upper sides of cages, draping it across several if necessary.

Mulching to Cool and Save Water
The soil around plants can need protection as much as the foliage above the ground. Mulch is essential for growing anything other than drought-tolerant vegetables in the Southwest and many areas with changing climate patterns. A 3-inch layer of mulch in any vegetable garden cuts down on weeds (which compete for water and nutrients) and cools the ground around plants. Mulch also helps retain precious moisture. There have been times when I could not afford to mulch an entire garden, but I think plants always do better with good mulches.
- Straw: This is a top choice for vegetable gardens, especially large ones, since it comes in bales. Straw is made of the hollow stalks of harvested grains, so it introduces fewer weeds than grass-based hay. It is lighter than hay and typically available from farmer coops or home improvement centers. A bale can last more than one season, which saves money but requires a good dry place to store the remaining bale.
- Salt hay: Weed-free salt hay, which comes from salt marshes, is excellent for water retention and does not mat easily, so it retains air flow. It is available in some areas of the country and also comes in bales.
- Fall leaves: Leaves from your yard are free and will do in a pinch but are not as clean or effective as many commercial options. Leaves eventually mat and might disrupt flow of air and water. I have used them more as an overwinter mulch to add organic matter to the soil by spring.
- Grass clippings: Clippings can get moldy and bring along weed seeds, but are also free and available throughout the growing season.
- Synthetic mulches: In most cases, you want organic mulch for an edible garden. But some plants, like melons, need warm soil. I have used black plastic or black landscape fabric around cantaloupes to retain ground warmth. Just be sure to leave enough space for water and air to flow through and remove the plastic after the growing season.
Finally, avoid larger mulches like wood chips or pine bark nuggets in the vegetable garden, since the large pieces take a long time to break down in the soil, and can compete with annual vegetables for nitrogen.

Tips for Protecting Sensitive Vegetables
There is plenty you can do with repurposed objects or on-hand tools to protect your vegetables from extreme temperatures. Here are some additional tips:
- If you can’t be home during peak heat, opt for a lighter shade cloth (30 to 40 percent) and put it up as late in the morning as possible so the plants get some full sunlight before leaving the shade on all day.
- Be sure to watch the sun pattern in your vegetable garden so you can optimize shade during the hottest times of the day by placing it between the sun’s path and the plant.
- Always try to ensure that the object you’re using to protect a vegetable does not restrict airflow, irrigation, or growth. Materials against foliage also can damage it with constant rubbing or stifling of air. Be sure to remove cloches or buckets as plants grow and temperatures warm.
- Likewise, if you see heavy condensation forming inside a cloche or other plant protector, remove it for a while, especially when warm, or poke additional holes in the cloche.
- When filling walls of water, I had the most success placing a 5-gallon bucket on the ground first, opening the wall of water around the bucket, and filling each slot partially, then going back around to fill them completely. Once all are filled, lift the bucket out so the wall of water can close at the top.

Helpful Tools
I can’t count how many 5-gallon buckets we have owned over the years and how many ways we use them around the yard and garden. For example, they can help protect young plants from wind and storms. Just cut out the bottom of the bucket, twist it into the ground around the plant, and drive in a rebar stake or similar object to help keep the bucket from blowing up or away. Other helpful tools and repurposed objects for saving vegetable plants from temperature extremes include:
- Shade cloth and row cover remnants
- Plastic spring clamps of varying sizes (large for PVC, small for metal fencing)
- Household clamps like clothespins or even metal binder clips to secure cloth on tomato cages
- Low tunnel hoop loops to hold row cover or support shade cloth over small plants
- Leftover wooden stakes, metal stakes, or rebar, which can hold a bucket in place
- Broken bricks or pavers to help hold down row cover
- Cable ties to secure one side of a shade cloth
